Starting from Data
As a first excercise in developing workbooks, we will reproduce some of the workbooks from tha last chapter, starting with the deal valuation.
Importing Message Types
We will start by using exsisting data in the Data Lake and connecting to it by importing the type as a map.
-
Open a new blank workbook and open the Launch Pad
- if you cannot see the Launch Pad press CTRL + SHIFT + E to open it.
-
Navigate to
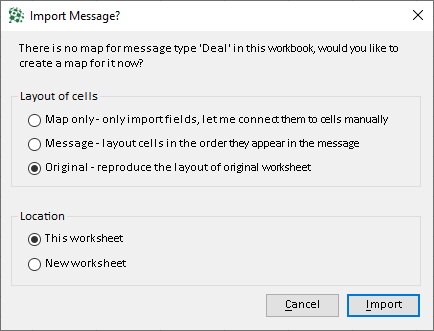
Tutorial > 01. Welcome > 2. Deal Data Entry.xlsx - Double-click message
123to bring up the Import Message Dialog

Now there are three didderent ways you can import a Message Type:
Map Onlywill only create a map for this type, any connections to cells need to be created manually.Messagewill create a map and create connections in the workbook in the order the data is layed out in the message.Originalwill open the orignal workbook to map cells as they are in there.
Map Only
- Leave the setting to
Map Onlyand clickImport.
You will now see the Maps & Messages pane appear with a new map Deal.

The orange back color means the properties are not connected.
- Drag the connections onto workbook cells:
Idto cellB3Periodto cellC3Cashflowto cellD3
tip
If you want to connect an array as a column hold down the
CTRLkey. This only works for arrays, single properties and 2D ranges are not affected.If you want to insert a value between two other cells and create space for it, hold down the
SHIFTkeyIf you want to insert an array as a column, hold down
CTRL + SHIFT
Your workbook should now look like this:

- Double-click message
234to see the numbers change to verify the corect cells are connected.
This is how you can create connections as 'Map Only' by dragging individual properties to their intended location. This gives complete control over how connections are created and is useful when only a few properties of the message are going to be used.
- Keep the workbook open for the next step
Message Layout
Message Layout will automatically loop over the properties in the message and create connections for them. This is useful when you want to import every property in a message.
- Navigate to
Tutorial > 01. Welcome > 3. Interest Rates Data Entry.xlsx - Double-click
EUR, 2020_12_24to bring up the Import MessageType dialog - Select
Messageand clickImport

Your workbook should now look like this:
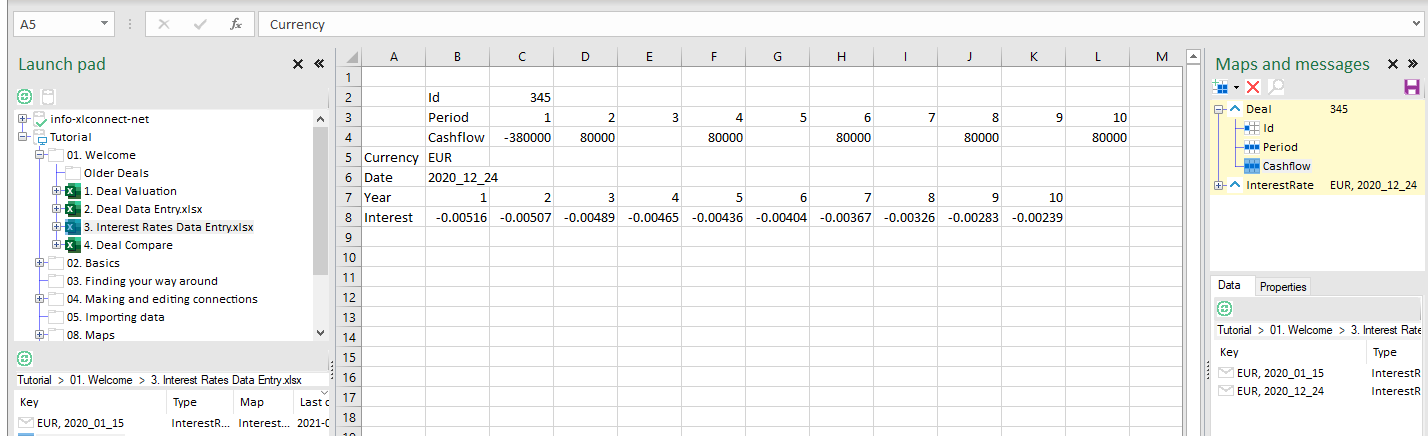
The new import is done straight against the left margin and the data above, let's create some space:
- Select range
A5:K8and move it one cell down and to the right (select the cells and then drag them there)


- Double-click other deals to verify the data is still put in the correct cells.
That's how you can import Message formats automatically. This especially saves time when messages contain a lot of fields. You connect all the cells in one go and then drag them to their final location.
Original Layout
The third way to import a message is to put all the cells in the same location as they were in the original sheet.
Note: To be able to do this you need to have read access to the workbook that produced the message
- Create a new empty Workbook (with CTRL + N)
- Navigate to
Tutorial > 01. Welcome > 2. Deal Data Entry.xlsx(only navigate to it by selecting it, do not open it) - Double-click deal
123and select the third optionOriginaland click Import.
Your screen should now look like this.

Notice how all the cells are in the same position as they were in the Deal Data Entry workbook. This way of importing data is useful when workbooks have an intricate layout in the original that you want to copy to the new sheet.
Mulitple Maps of the same type
In chapter Using Excel connect an example was given with multiple maps of the same type. When there is already a map with that type, double-clicking will only load the message. To import a second or subsequent map of the same type, either:
- Right-click on the message and select Import Message Type to bring up the Import Dialog again

- Alternatively you can also create a copy of an existing map and move that.
Map settings when importing
Map Default Location
When a map is imported from a particular message, the default location for that map will be set to the location of that message. As other instances of this type of message are likely to be stored in the same location this helps users find them with little effort.
More on map location in Maps.
Map Direction
When a map is created from importing a message, the map direction will be set to Input (to the sheet). This means data can be loaded into the sheet, but not saved from. This is to guide data in a certain direction in workflows and prevent accidental overwriting of data.
More on map direction in Maps.